Employee Self-Service - view roster and set availability

Return to HR Self-Service user guides webpage for links to alternative HR Self-Service guidance.

6.a. View roster and availability (participating departments only)

Roster functionality is currently available to participating departments only

To see if you are part of this pilot refer to our dedicated webpage or contact your local HR team/contact for more details.

Watch our short promotional video to see how to use the roster functionality via the Mobile App! 

Email notification- you will be receive email notification to your work email once your weekly roster(s) has been shared.  

Viewing your roster - once shared, your roster is available in HR Self-Service to view from either the PeopleXD Mobile App or via the HR Self-Service website.

Download the Mobile App - If you haven't already downloaded the Mobile App, refer to the Download and use Mobile App guidance for details on how to download, set-up and use the PeopleXD Mobile App.

Additional details not covered in this guide can be found in our Frequently Asked Questions.


Once you have received email notification that your roster is available, follow the steps below:

  1. Open the PeopleXD Mobile App (you will need to have already downloaded and set this up, refer to Download and use Mobile App guidance for details).
  2. From the Home screen press the Menu option and select Shifts.


  1. You will then be able to view all the shifts that you have been rostered to work, this includes:
    • Date
    • Start and end time
    • Working area

Once you have received email notification that your roster is available, follow the steps below:

  1. Ensure that you are on the Employee Dashboard.

  1. From the Calendar menu you will then be able to view all the shifts that you have been rostered to work, this includes: 
  • Date
  • Start and end time
  • Working area

Key Description
A Choose between day / week view.
B Use to scroll between different months.
C Highlight which week you want to view.
D Here you will see the shift details.  If roster hasn't been shared it will show as 'Not Published'.
E Use scroll to see shift details. 
F Ellipsis menu used to access for more options which are covered in relevant guidance. Option does include View Full Screen.


Where needed, staff can choose to record their availability (or unavailability) in addition to their working pattern which is already recorded on their staff record.  We recommend that before recording your additional availability, it is agreed with your shift supervisor initially to avoid duplication and unnecessary time spent.

To record your availability, follow the steps below:

  1. Open the PeopleXD Mobile App (you will need to have already downloaded and set this up, refer to Download and use Mobile App guidance for details).
  2. From the Home screen press the Menu option and select Shifts.

  1. Press the Availability menu, you are then presented with your availability for the following week.
  2. If you have more than one role at the University, select accordingly from the Appointment.  If you are in any doubt contact your local HR team.  
  3. If you wish to record your availability for an alternative week, amend the Availability From and Availability To fields accordingly.
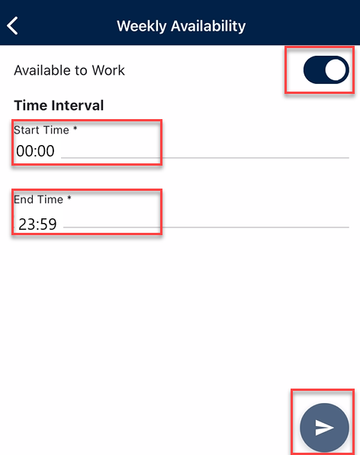
  4. To record that you are available to work additional hours:
    1. Press on the specific day.
    2. Slide toggle to the right (so it's active).
    3. Enter the hours you're available to work into the Start Time and End Time fields.
    4. Press the arrow to continue.

  1. Your manager will receive this request for their approval. Once approved it will show in your future Availability.    
  2.  To record that you are unavailable to work additional hours:
    1. Press on the specific day.
    2. Slide toggle to the left (so it's inactive).
    3. Press the arrow to continue.
    4. Your manager will receive this request for their approval. Once approved it will show in your future Availability.    

Where needed, staff can choose to record their availability in addition to their working pattern which is already recorded on their staff record.  We recommend that before recording your additional availability, it is agreed with your shift supervisor initially to avoid duplication and unnecessary time spent.

To record your availability, follow the steps below:

  1. Ensure that you are on the Employee Dashboard.

  1. From the Calendar menu click on the ellipsis menu and select Roster Availability.  
  2. Based on the dates you wish to record, select the Monday of that week from the Week Starting field.
  3. If you have more than one role at the University, select accordingly from the Appointment field. If you are in any doubt contact your local HR team.  
  4. To record that you are available to work additional hours:
    1. Navigate to the specific day.
    2. Enter the hours you're available to work into the Start Time and End Time fields, eg 00:15 - 23:45.
    3. Press SAVE to continue.
    4. Your manager will receive this request for their approval. Once approved it will show in your future Availability.  

Log into HR Self-Service


You must be on the University's network / VPN

LOGIN

Contact


Having issues?

  1. Check the relevant user guide
  2. Visit the FAQs and Troubleshooting pages
  3. Still having problems? Contact your local HR for help.