How-to guide: Manager Self-Service - record annual leave, sickness and other absences

5. Guidance and training for recording annual leave, sickness and other absences

To see a quick overview of the absence functionality, refer to our short promotional video.

The guidance below is for managers to record a annual leave, sickness and other absences via HR Self-Service for staff they manage.

The following online training is also available:

Note:

- This feature is currently limited to staff in participating departments which is being rolled out in stages throughout the University.  Liaise with your local HR team to confirm when your department will begin to use this functionality. 

- Staff in NDM should initially seek guidance from their local HR team with regards to local practice. 


Annual leave

  • The University's Holiday entitlement policy can be found on the HR Support webpages
  • Staff who have questions relating to leave entitlement and balance, should liaise directly with their local HR team.
  • The relevant departmental fixed closure and public holidays have been applied to staff appointment(s) along with any qualifying long service.
  • Staff contracted to work full-time hours will be given their entitlement in days.  Staff contracted to work part-time hours or who have a non-standard full-time hours working pattern, will be given their entitlement in hours.
  • An individual's holiday balance is calculated automatically, refer to Example of HR Self-Service Holiday Calculation which shows how it compares to the University holiday calculator and an explanation of the terminology used in the My Balances screen in HR Self-Service.   

Overtime

  • The University's policy relating to Overtime, which incorporates eligible staff being able to request time off as Time Off In Lieu, can be found on the relevant webpages of the HR Support website

Other leave and absence policies and process

  • A fit note is required for any sickness absence that extends seven calendar days.
  • The University's policies for all other leave types can be found on the HR Support webpages
  • There is no automatic notification to the central payroll team, unpaid leave for example needs to be managed by your local HR team.
  1. Navigate to the Manager Dashboard and the My Team widget.
  2. From the Actions menu select View Scheduler.
view scheduler


  1. The Team Scheduler screen opens, locate the relevant individual (to record their leave/ absence).  Use the search option if needed.
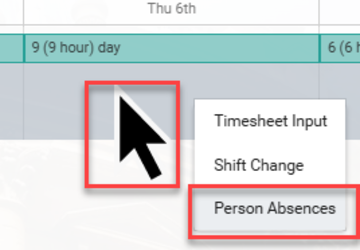
  2. Click into the first date of the leave/ absence in the date column and select Person Absences.
  3. The Person Absences screen will show all approved leave and any absence recorded by a manager or HR team.  Review the records to ensure the leave/ absence hasn't already been recorded.
  4. Click Add Absence.
  5. From 1. Absence Details, complete the fields as detailed below:
Field (* mandatory) Description
Leave Type Using the drop-down arrow, select the appropriate leave type (eg Annual Leave, TOIL, Compassionate Leave). For information about other types of leave, please refer to the Staff Handbook and/or consult with your HR team.
Start Date Using the calendar icon, select the start date of the individual's leave.
Part Day Leave Only select if the absence is for part of a day and you wish to record the absence as a segment, eg 1/2 day.
End Date Using the calendar icon, select the end date of the individual's leave.  Option isn't available if Part Day Leave has been selected.
Segments Only visible and required for a part day leave.  Select accordingly, eg 1/2. 
Time of day Only visible and required for a part day leave. Select accordingly, eg PM. 


  1. Click Next (or select 2. More). 
  2. From 2. More, select Annual Leave - no reason required in the Reason field.
  3. Click Save. A success message will appear - wait for the dark green line to fill. 


Note:

If recording leave in a future annual leave year, please note that the bank holidays and any fixed closure dates will not have been recorded. If you unintentionally record one of these days, the balance for the future annual leave year will not be adjusted correctly.


Warning: If the absence is unpaid, you must notify your local HR team who will process this.  


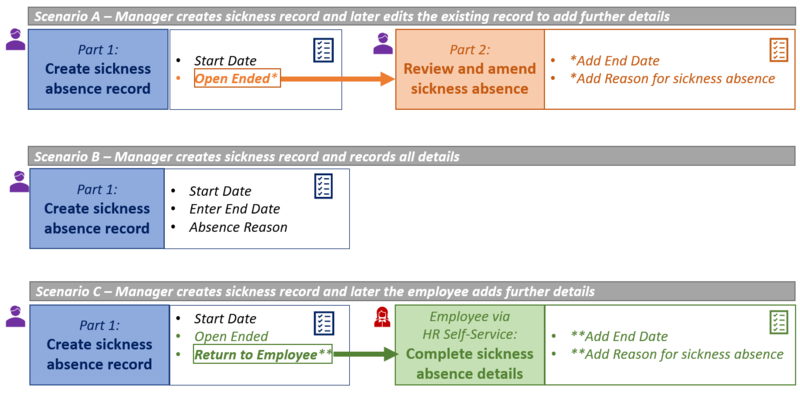
You have three system options for recording sickness absence.  This provides flexibility on either recording the absence straightaway when the person goes off sick or recording it retrospectively.  It also allows for the employee themselves to add certain details or for the manager to record everything.

  1. See overview of all the scenarios below and identify which relates to what you are recording.
sickness recording options


The following covers part 1 of recording sickness absence, as described in section 'Record Sickness absence - what options are there?'    

The guidance has been split into the three scenarios, after step 7, only follow the relevant option for your scenario.

  1. Navigate to the Manager Dashboard and the My Team widget.
  2. From the Actions menu select View Scheduler.
view scheduler


  1. The Team Scheduler screen opens, locate the relevant individual (to record their sickness absence).  Use the search option if needed.
  2. Click into the first date of the leave/ absence in the date column, you may need to use the Calendar option to find the date.
  3. Select Person Absences.
  4. The Person Absences screen will show all approved leave and any absence recorded by a manager or HR team.  Review the records to ensure the absence hasn't already been recorded.
  5. Click Add Absence.

Scenario A - Manager creates sickness record and later edits the existing record to add further details:

  1. From 1. Absence Details, complete the fields as detailed below:

Field

(*mandatory)

Description
Leave Type Using the drop-down arrow, select Sickness Absence.
Start Date Using the calendar icon, select the start date of the individual's leave.
Open Ended Switch the toggle on.


  1. Click Next (or select 2. More).
  2. Update the Reason to 'Placeholder - Employee to Confirm'.
  3. Click Save. A success message will appear - wait for the dark green line to fill. 
  4. Return to the Part 2 Review and amend sickness absence section when the individual has returned to complete the absence record.

Scenario B – Manager creates sickness record and records all details

  1. From 1. Absence Details, complete the fields as detailed below:

Field

(*mandatory)

Description
Leave Type* Using the drop-down arrow, select Sickness Absence.
Start Date* Using the calendar icon, select the start date of the individual's absence.
Part Day Leave Only select if the absence is for part of a day and you wish to record the absence as a segment, eg 1/2 day. 
End Date Using the calendar icon, select the end date of the individual's leave.  Option isn't available if Part Day Leave has been selected.
Segments

Only visible and required for a part day leave.  Select accordingly, eg 1/2. 

Time of day Only visible and required for a part day leave. Select accordingly, eg PM. 


  1. Click Next (or select 2. More).
  2. From 2. More, complete the fields as detailed below:

Field

(*mandatory)

Description
Reason Record the reason for their sickness absence.  If selecting Other, enter details into the Narrative field.
Narrative If applicable, enter any further relevant details.


  1. Click Next (or select 3. Return to Work Interview)
  2. From 3. Return to Work Interview, complete the fields as detailed below:

The screen is optional and should be updated at the discretion of each department.  It is useful for reporting purposes, but does not send any information to other departments eg Health and Safety.  

Field

(*mandatory)

Description
Work Related If the absence was due to work slide the toggle on.
Interview Completed Slide toggle on to indicate interview has taken place. 
Return to Work Interview (RTWI) Date Using calendar icon, record date the interview took place.
Interview Notes If applicable, enter any further relevant details.


Click Save. A success message will appear - wait for the dark green line to fill. 

Scenario C – Manager creates sickness record and later the employee adds further details

  1. From 1. Absence Details, complete the fields as detailed below:

Field

(*mandatory)

Description
Leave Type Using the drop-down arrow, select Sickness Absence.
Start Date Using the calendar icon, select the start date of the individual's leave.
Open Ended Switch the toggle on.
Return to Employee Switch the toggle on.


  1. Click Next (or select 2. More).
  2. Update the Reason to 'Placeholder - Employee to Confirm'.
  3. Click Save. A success message will appear - wait for the dark green line to fill. The individual will now receive an email inviting them to complete the record (eg end date and reason). 

The following covers part 2 of updating sickness absence records, as described in section 'Record Sickness absence - what options are there?'    

The navigation guidance can also be used if you wish to edit any absence records (eg if there any errors). 

  1. Navigate to the Manager Dashboard and the My Team widget.
  2. From the Actions menu select View Scheduler.
view scheduler


  1. The Team Scheduler screen opens, locate the relevant individual, use the search option if needed.
  2. Click on any date and the Person Absences option will appear.  Click Person Absences
  3. The Person Absences screen open.  Locate the sickness record you wish to update and from the ellipsis (three dots menu) select View/ Edit Absence Details.
  4. Update the relevant fields necessary fields, including the End Date (1. Absence Details) and Reason (2. More) for absence. For further detailed guidance on each field, refer to the 5.5 Part 1 Create sickness absence record section of this guide.
  5. Click Save.

Follow guidance below where an absence record has been created in error and needs to be deleted. 

  1. Navigate to the Manager Dashboard and the My Team widget.
  2. From the Actions menu select View Scheduler.
view scheduler


  1. The Team Scheduler screen opens, locate the relevant individual, use the search option if needed.
  2. Click on any date and the Person Absences option will appear.  Click Person Absences
  3. The Person Absences screen open.  Locate the sickness record you wish to delete and from the ellipsis (three dots menu) select Delete Absence.
  4. Click Save.

Log into HR Self-Service


You must be on the University's network / VPN

LOGIN

Contact


Having issues?

  1. Check the relevant user guide
  2. Visit the FAQs and Troubleshooting pages
  3. Still having problems? Contact your local HR administrator for help.