- You can find the University's Holiday Entitlement Policy on the HR Support webpages.
- For any questions about your entitlement or leave balance, please contact your local HR team.
- Departmental fixed closure days and public holidays have already been applied to your appointment(s), including any additional leave for long service where applicable.
- If you work full-time, your entitlement is displayed in days. For part-time staff or those with non-standard full-time hours, your entitlement is shown in hours.
How-to guide: Employee Self-Service - check annual leave balance and request annual leave
Return to HR Self-Service user guides webpage for links to alternative guidance.
3.a. Request annual leave (participating departments only)
Note: Annual leave functionality is currently available only to participating departments.
We are rolling this feature out in stages, with future rollout planned through 2025. Please contact your local local HR team for more details.
Other absences
Annual leave is the only type of absence that staff can request via HR Self-Service. All other absences, eg sickness and volunteering etc, are recorded by their manager/ their local HR team.
TOIL
You can request annual leave via HR Self-Service but not Time Off In Lieu (TOIL). Your manager and your local HR team are able to use the system to record this as an absence, which will be in-line with departmental processes and the University's policy. Please note the accrual calculation and request for TOIL is handled off-system.
Watch our videos:
- Navigate to the Balances tab.
- Select View from the Balances widget (if you have multiple appointments/ roles, select the appropriate one you wish to view).

- See screen overview below:

| Key | Screen label | Details |
|---|---|---|
| A | Appointment | If you have multiple appointments, ensure the correct one is selected. |
| B | Entitlement (days/ hours) | Shows how your entitlement for the year has been calculated and if applicable, updated by your local HR team. |
| C | Carried (days/ hours) | Lists any unused hours/ days from previous annual leave year, which must be taken by 31 December in current leave year. |
| D | Taken (days/ hours) | Lists any annual leave days/hours already taken in current leave year. |
| E | Booked (days/ hours) | Lists details of your approved leave (days/hours) which are in the future. |
| F | Balance (days/ hours) | Gives you your remaining leave balance (still to book). |
| G | View Narrative | Provides further details of system calculations and updates made by local HR teams. |
Note: Any requests not yet approved, will not be factored into your balance.
From the Co-Workers Calendars, you can see what leave/ absence staff within your team, along with your manager, have requested/ booked. Please note teams members in HR Self-Service are managed by your local HR team.
There are three ways to navigate to the Co-Workers Calendars screen, see details below:
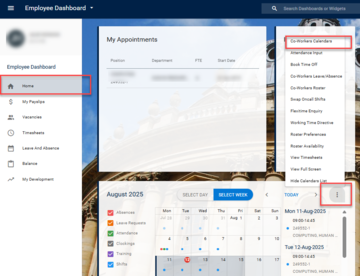
- Option 1 - from the Home screen. See below.
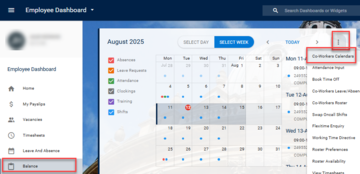
- Option 2 - when viewing your annual leave balance: See below.
- Option 3 - when completing an annual leave request: Refer to the separate Request annual leave section below.
Option 1 - navigate to the Co-Workers Calendars from the Home screen
- Navigate to the Home tab.
- From the ellipsis highlighted below, select Co-Workers Calendars.

Option 2 - navigate to the Co-Workers Calendars when viewing your annual leave balance
- Navigate to the Balance tab.
- From the ellipsis highlighted below, select Co-Workers Calendars.

View the Co-Workers Calendars
Refer to the key in the table below the image to understand the key details on this screen. If you have multiple roles or are on secondment, pay close attention to which job role is selected (B).

| Key | Description |
|---|---|
| A | If you want to search for one individual, enter their name to find their availability only. |
| B | If you have multiple roles or you are on secondment, ensure the correct role is selected. |
| C | Navigate to different weeks, either using arrow keys or the calendar option. |
| D |
Rostered staff: Can switch between Team Area Co-Workers (for rostering purposes) or Co-Workers (for your team). Non-rostered staff: Select Co-Workers. |
| E | Your Co-Workers (or Team Area Co-Workers if selected for rostered staff) will be listed here. |
| F |
Here you will see when your team are scheduled to work and their availability, ie do they have any leave or absence recorded. See further details below: CD = (Fixed) Closure Day. PH = Public (bank) Holiday. AL = Annual leave, note, unapproved leave requests show in white and approved show in blue. AB = Absence (any absence which is not annual leave). Yellow dates = indicate individual is contracted to work and have no leave/ absence etc booked. White dates = indicate individual is not contracted to work (this is a way of indicating some part-time staff). Mixed colours for one date = indicates individual is absent for half day only. Recommend that you hover over dates of interest to see more details eg, AM or PM for half day absences, contracted working hours. |
- To exit the screen, select Employee Dashboard in the breadcrumb.
Follow these steps to request annual leave, whether for full days or partial days:
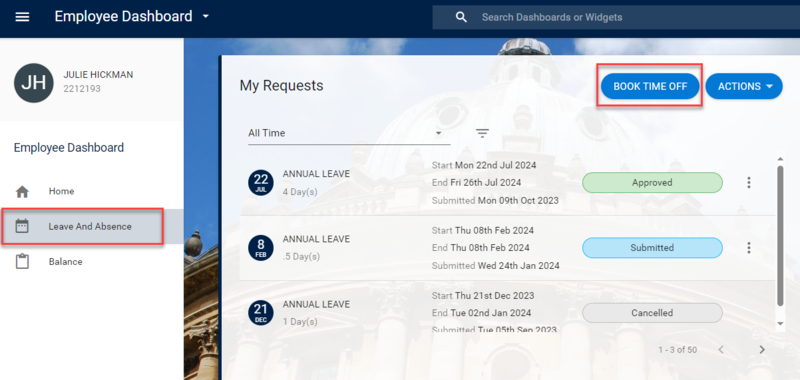
- Navigate to the Leave and Absence tab.
- Click Book Time Off from the My Requests widget.

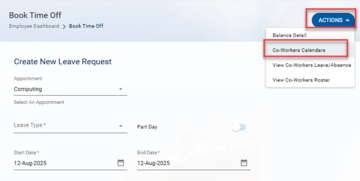
- The Create New Leave Request form opens.
- Should you wish to check your co-worker's requested/ booked leave and absence, from the Actions button select Co-Workers Calendars:

- Refer to the View my co-worker's availability separate guidance section above.
- To exit the Co-Workers Calendars screen, select Book Time Off* in the breadcrumb.
- Refer to the instructions below (to request annual leave).
- Complete the following fields:
|
Field name (* mandatory) |
Description |
|---|---|
| Appointment* | Use the drop-down to select the correct appointment (if you have multiple). |
| Leave Type* | Select the appropriate leave type (eg Annual Leave). For other types of leave, refer to the Staff Handbook or consult your HR team. |
| Start Date* | Use the calendar icon to select the start date of your leave. |
| End Date* | If booking full days of leave, use the calendar icon to select your end date. For partial days, switch the toggle against 'Part Day' and follow instructions below. |
|
Part Day (only if applicable) See note below regarding system rounding |
Switch the toggle on to activate partial day options (the End Date field will disappear).
|
| Reason* | Select option as applicable. |
| Comments | Optional - add any relevant details. |
- Click Submit. Your request will be visible in the My Requests widget on your Employee Dashboard. You will receive an email once your request is approved or rejected.
Note:
If booking leave for a future annual leave year, be aware that bank holidays and fixed closure dates may not yet be recorded. If you book one of these dates unintentionally, your balance for that leave year may not adjust correctly.
System rounding
- If an individual requests half-day’s annual leave, the system will round up to the nearest half day/ hour. However, regardless of the number of part-days requested in the current leave year, the system will only round up to the nearest half day/ hour once. This ensures consistency and accuracy over a period by considering all the leave entries together.
- Although the rounding would only result in a very minor disadvantage. To avoid any potential rounding, individuals can choose to request leave in precise hours/minutes instead of part days. This approach minimises the impact of rounding.
If you have submitted a leave request which has not yet been approved, follow guidance below to edit the details:
Navigate to Employee Dashboard > Leave and Absence > My Requests (see more detailed guidance in previous section).
- Locate request you wish to edit, ensuring the status is Submitted.
- Click on the ellipsis- (three dots) on the right-hand side and click Edit. The Create New Leave Request screen opens.
- Make the relevant amendments.
- Click Submit. A success message will appear - wait for the dark green line to fill. You have now submitted your Leave Request for approval. The submitted request is visible in your Employee Dashboard, in the My Requests widget. Click on the white arrow to go back to your Employee Dashboard. You will receive an email notification once the request has been approved (or rejected).
You can only cancel a request for leave where the dates are in the future. If you wish to cancel request which in now in the past (and didn't take place), contact your local HR team.
Navigate to Employee Dashboard > Leave and Absence > My Requests (see more detailed guidance in earlier sections).
- Locate request you wish to edit, ensuring the start date is in the future.
- Click on the ellipsis- (three dots) on the right-hand side and click Cancel.
- A success message will appear - wait for the dark green line to fill. You have now cancelled your request. Your approver will be receive email notification of the cancellation.
Contact
Having issues?
- Check the relevant user guide
- Visit the FAQs and Troubleshooting pages
- Still having problems? Contact your local HR for help.


